TotalBay · demo tour
One car, start to finish
This tour follows one repair visit at a sample shop — first from the customer’s phone, then from the shop’s desk. The shop, customer, car, and numbers are all made up.
You don’t need a waiting room
With TotalBay, customers don’t sit in your lobby. They drop the car, leave, and handle the rest on their phone: updates by text and email, photos of what you found, the estimate to sign, and payment. When it’s done, they can pick up after hours.
Your people spend their time on cars instead of looking after a lobby.
- Appointments work like always. Book them on a calendar with a column for each tech.
- Text check-in and the key drop are an option, not a replacement. Walk-ins can use them, and appointment customers can drop the car the evening before or early morning — so the tech never starts on a hot engine.
Photos and videos do the selling
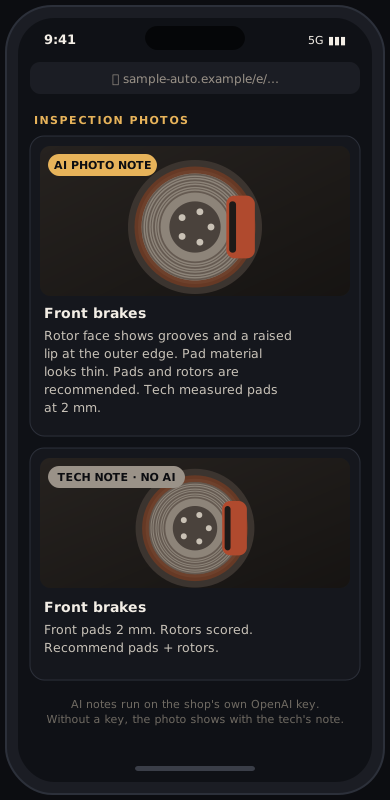
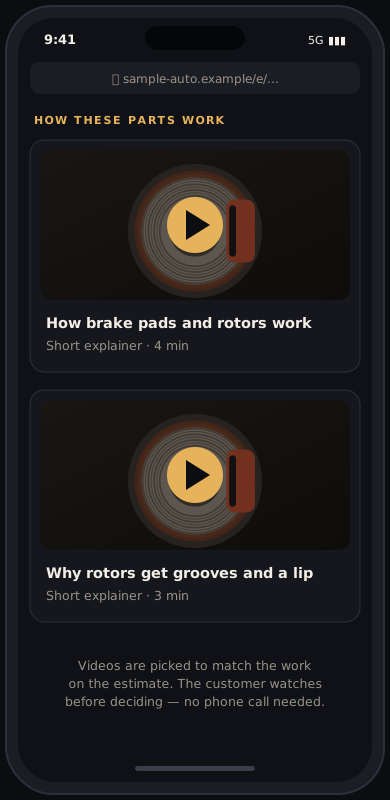
Customers approve work they can see and understand. Every estimate can carry your tech’s inspection photos and short how-it-works videos matched to the repair — so you’re not explaining brake rotors over the phone.
What your customer sees
Everything happens on the customer’s phone. No app, no account, no waiting around.
-
Step 1
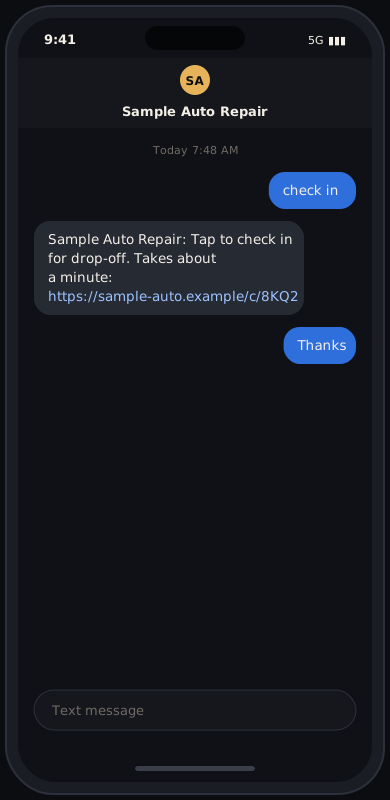
Books an appointment, or texts “check in”
Customers can book a regular appointment like always. Or, for a drop-off, they text “check in” to your shop’s number and get a link back. No app to download.
-
Step 2
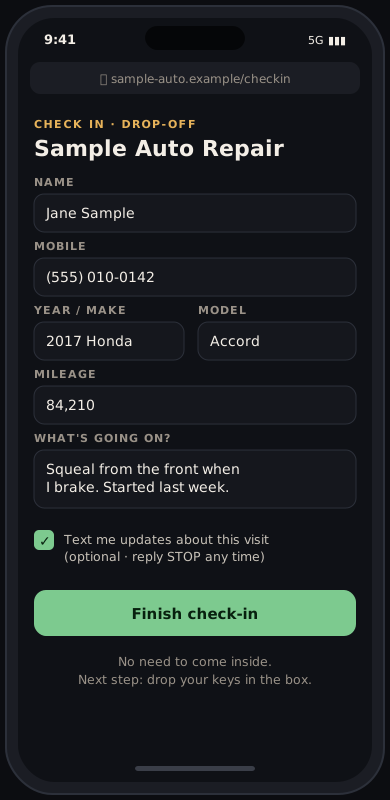
Fills out drop-off info
Name, phone, car, mileage, and what’s wrong — on their phone, in the parking lot. Text updates are optional; the customer checks the box.
-
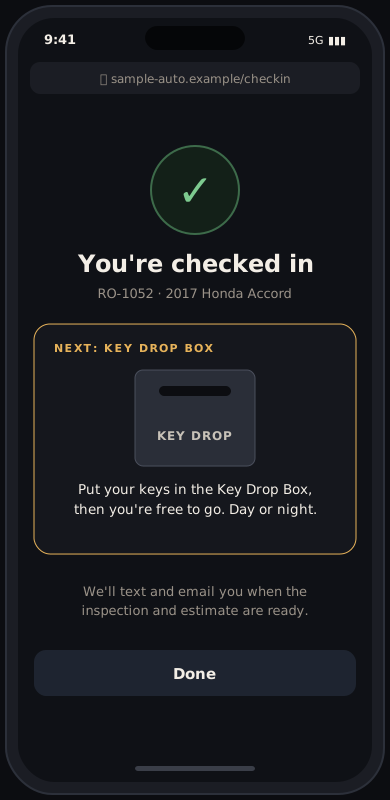
Step 3
Drops the keys and leaves
The phone tells them to put the keys in your key drop box. Works before you open and after you close. Appointment customers can drop the car the evening before, so your tech never starts on a hot engine.
-
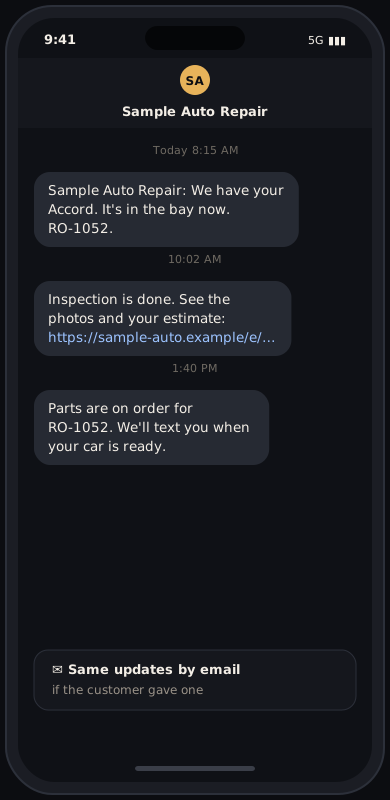
Step 4
Gets status updates
Texts and emails when the car is in the bay, when the inspection is done, when parts are on order, and when it’s ready.
-
Step 5
Sees inspection photos
Your tech’s photos show up on the estimate. With AI photo analysis on, each photo gets a written note — that uses your shop’s own OpenAI key. Without it, the photo shows with the tech’s note.
-
Step 6
Watches how-it-works videos
Short explainer videos matched to the repair show up on the estimate, so the customer understands the job before deciding. No phone call to walk them through it.
-
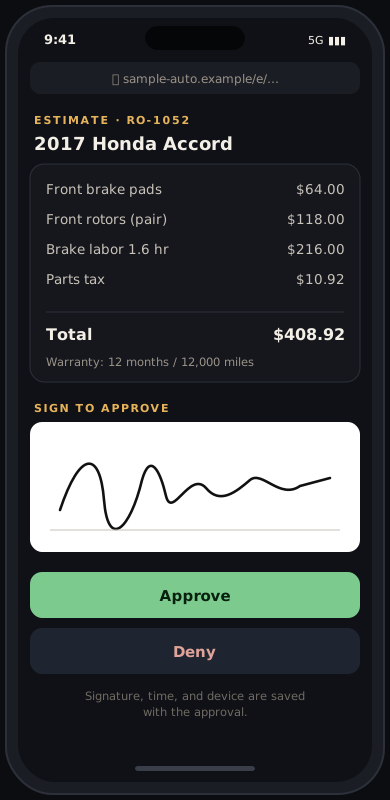
Step 7
Reviews and signs the estimate
Parts, labor, and total on one screen. They sign with a finger and tap Approve, or Deny. The signature is saved with the approval.
-
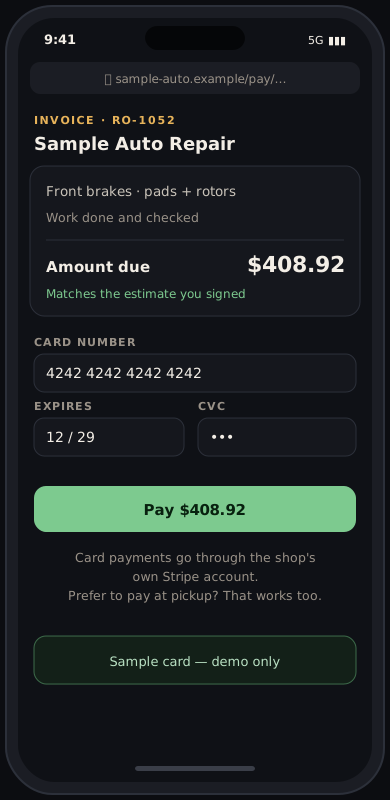
Step 8
Pays online
The invoice matches the estimate they signed. They pay by card through your own Stripe account, or pay when they pick up.
-
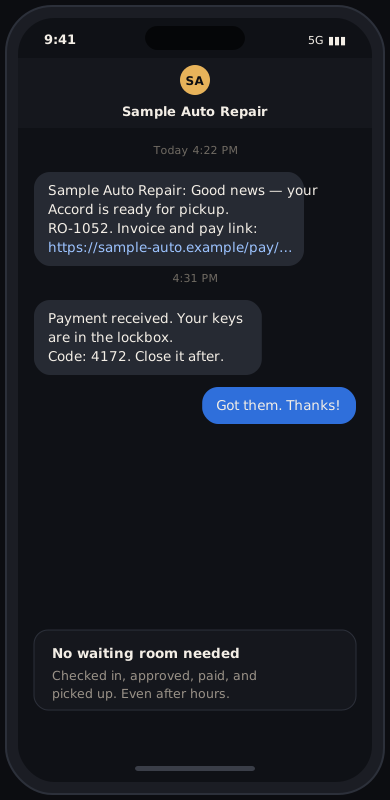
Step 9
Pays and picks up — even after hours
One text says the car is ready, with the invoice link. They pay online, and if you use a lockbox they get the code after paying and pick up the keys after you close or on the weekend.
Open a sample estimate yourself. It’s the customer’s view with photos, line items, and the signature box. You can sign and tap Approve — it’s a sample, so nothing is saved, sent, or charged.
Open sample estimateWhat your shop sees
The same visit from the desk and the bay. Built for shops with 8 bays or fewer, and it scales past that.
-
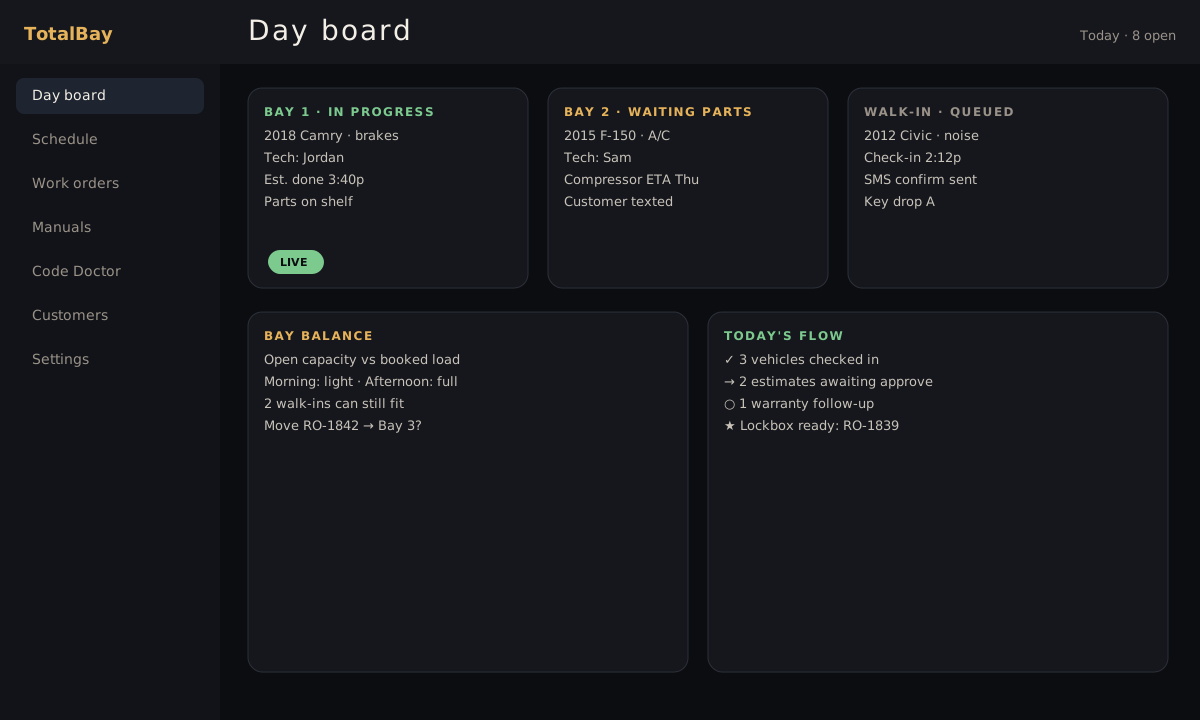
Step 1
Day board and bay board
Every open car on one screen: which bay, which tech, and what it’s waiting on. Bay balance shows how much room is left today.
-
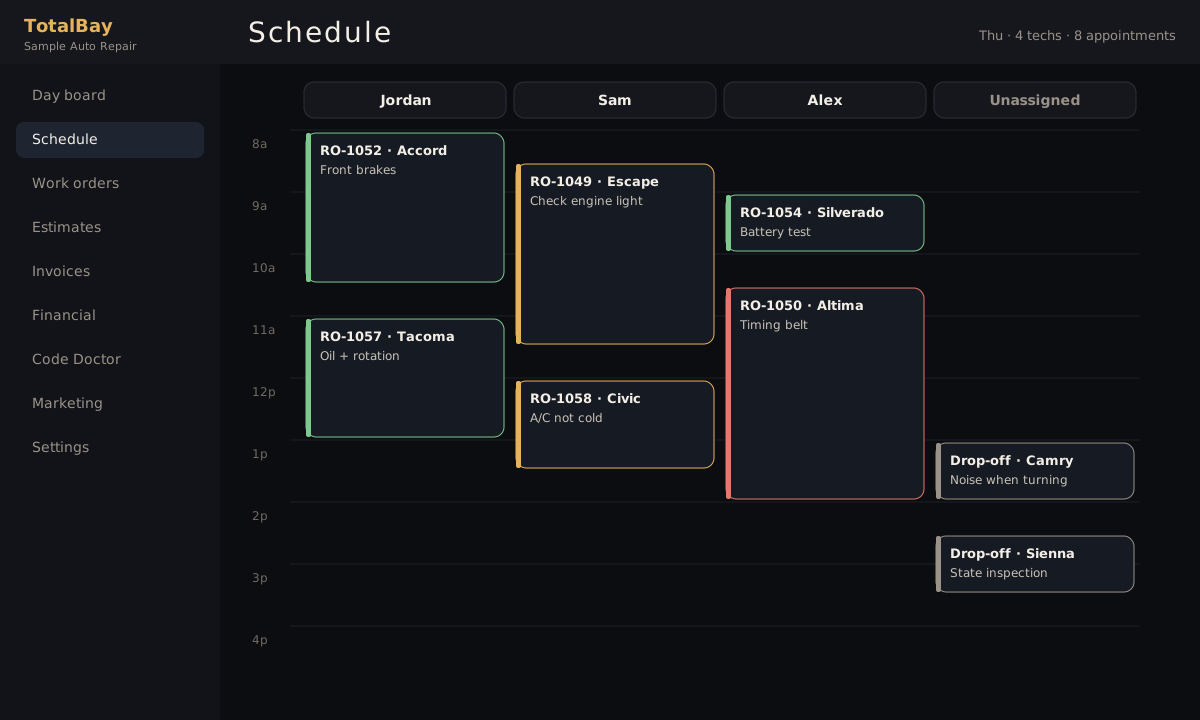
Step 2
Appointment calendar with tech columns
Regular appointments, one column per tech. Booked jobs and drop-offs land on the same calendar, so you can see who’s loaded and who’s free. Text check-in is an extra way in, not a replacement for appointments.
-
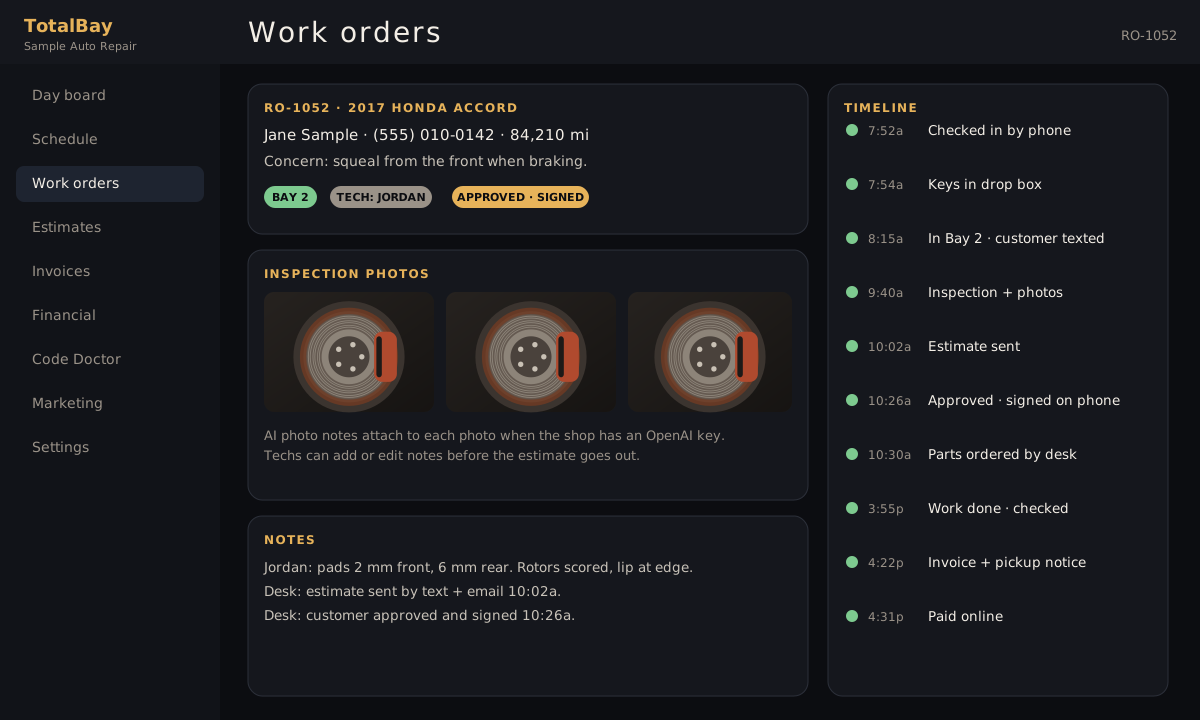
Step 3
Work orders
Customer, car, concern, photos, notes, and a timeline of every step — check-in, keys, estimate, signature, payment.
-
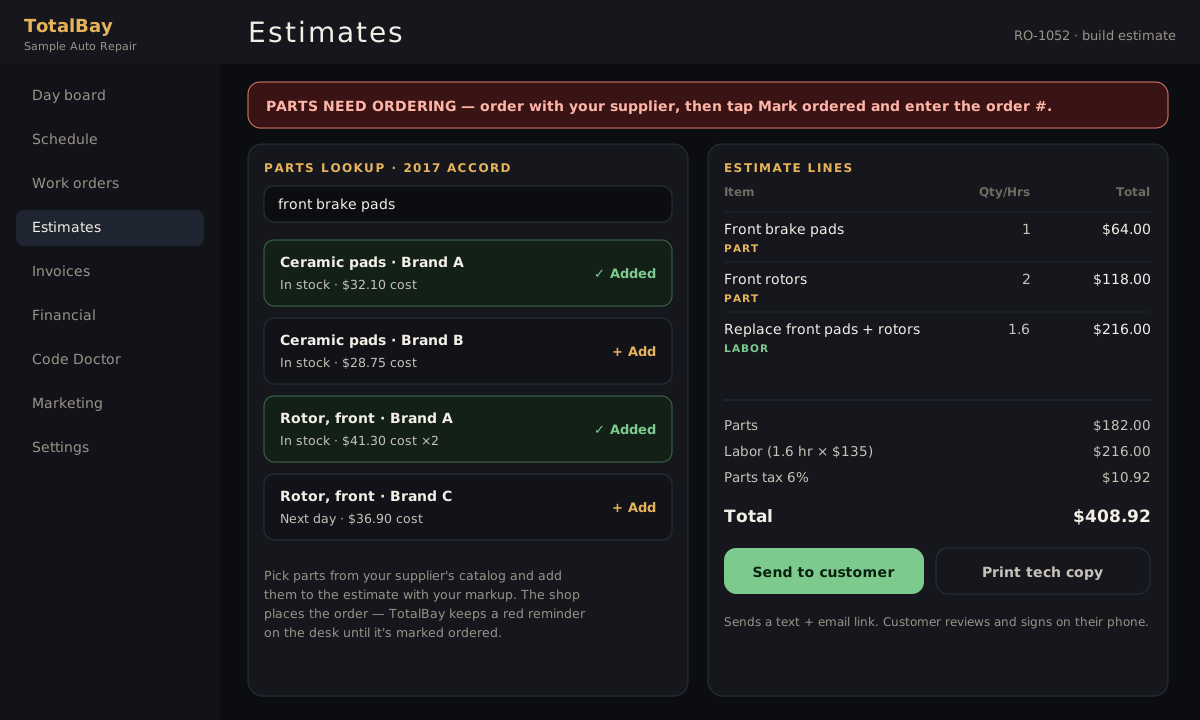
Step 4
Estimates with parts and labor
Look up parts, check the ones you want (nothing is added until you pick it), and add labor hours. Before an estimate goes out, TotalBay flags duplicate-looking parts — the same part number twice, too many pad sets or rotors — so the advisor can go back or send anyway. The team also sees the ticket’s parts cost % and gets an “are you sure?” if it looks off. You place the parts order with your supplier; the desk shows a red reminder until it’s marked ordered.
-
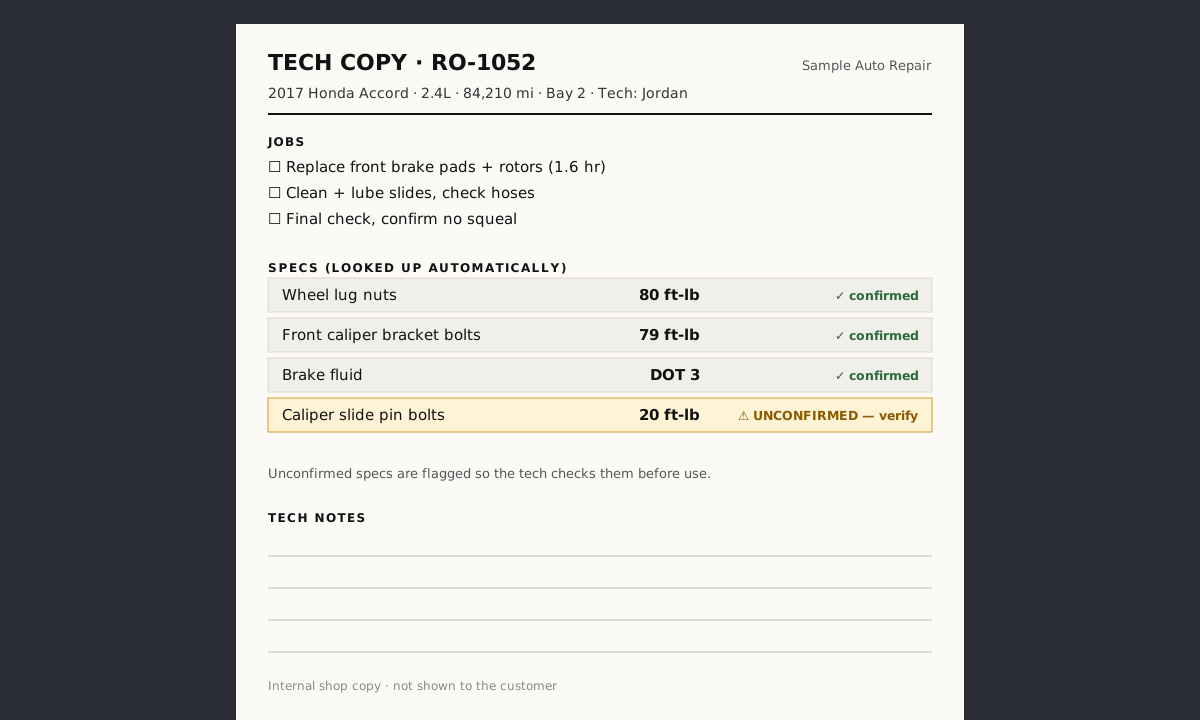
Step 5
Tech paper copy with specs
Torque specs, fluid types, and fluid capacities are looked up automatically and printed on the tech copy with the jobs. Any spec that isn’t confirmed is flagged so the tech checks it before using it.
-
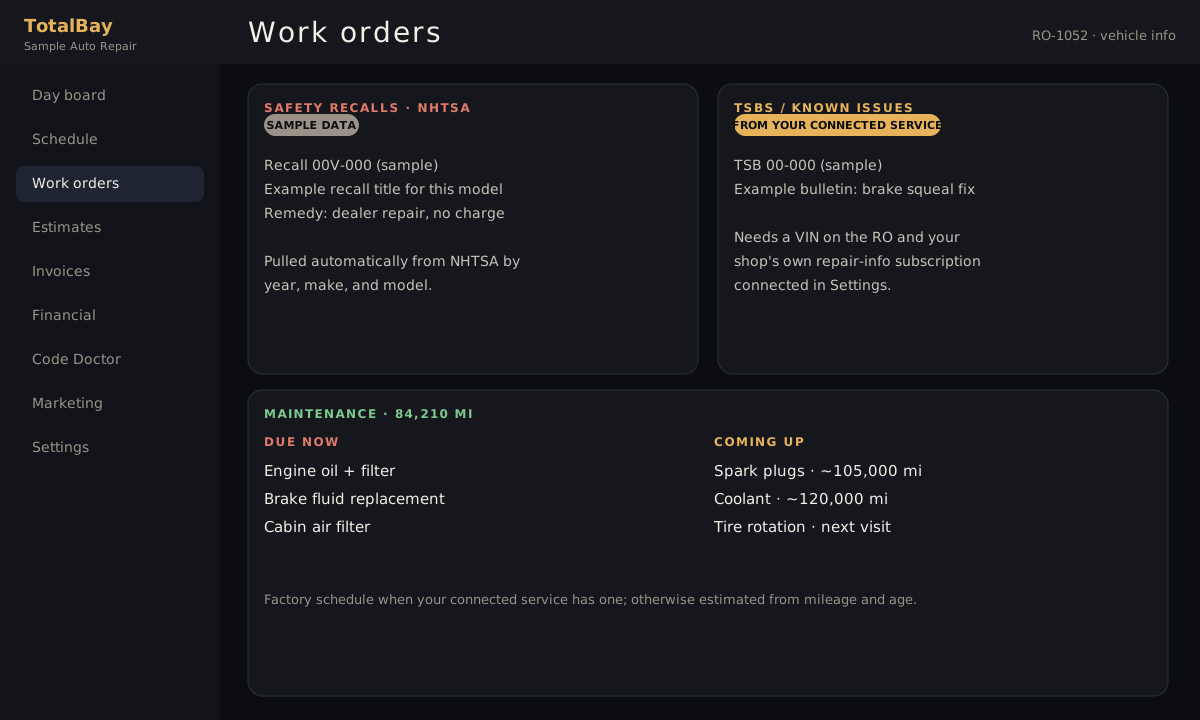
Step 6
Recalls, TSBs, and maintenance
Open safety recalls are pulled from NHTSA automatically. If your shop connects its own supported repair-information subscription, TotalBay also pulls TSBs and known issues (needs a VIN) and the factory maintenance schedule. Without one, maintenance due is estimated from mileage and age.
-
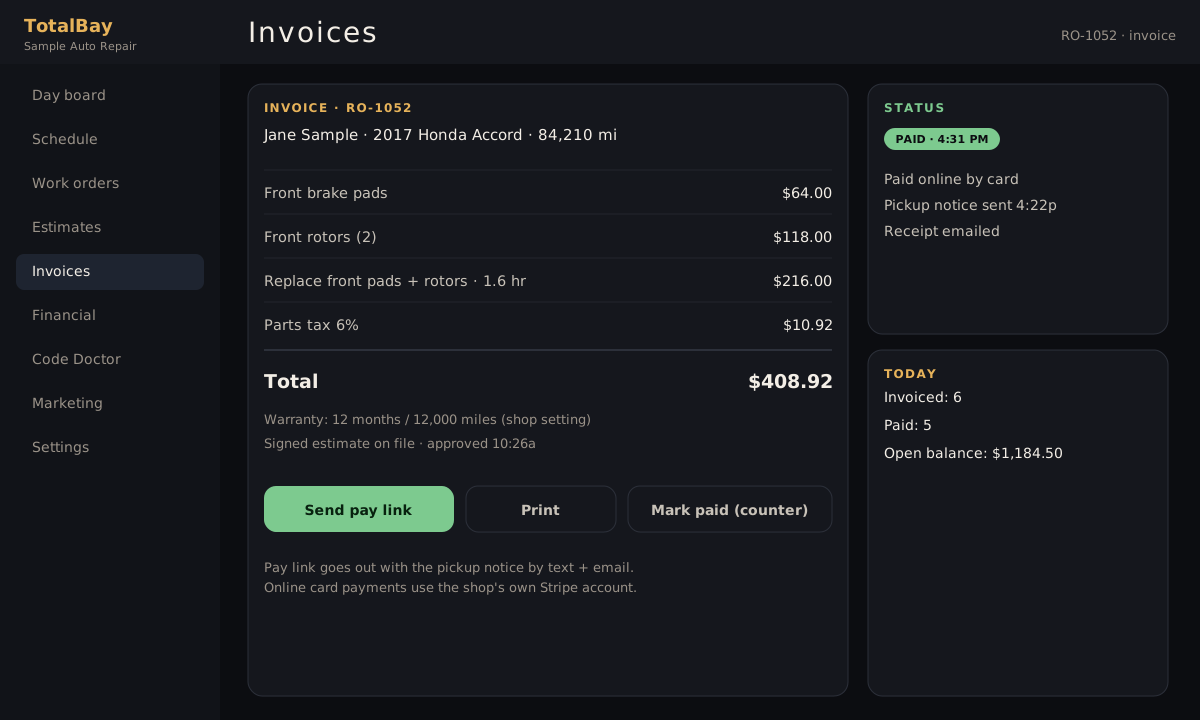
Step 7
Invoices
Turn the approved estimate into an invoice. Send the pay link with the pickup notice, or mark it paid at the counter.
-
Step 8
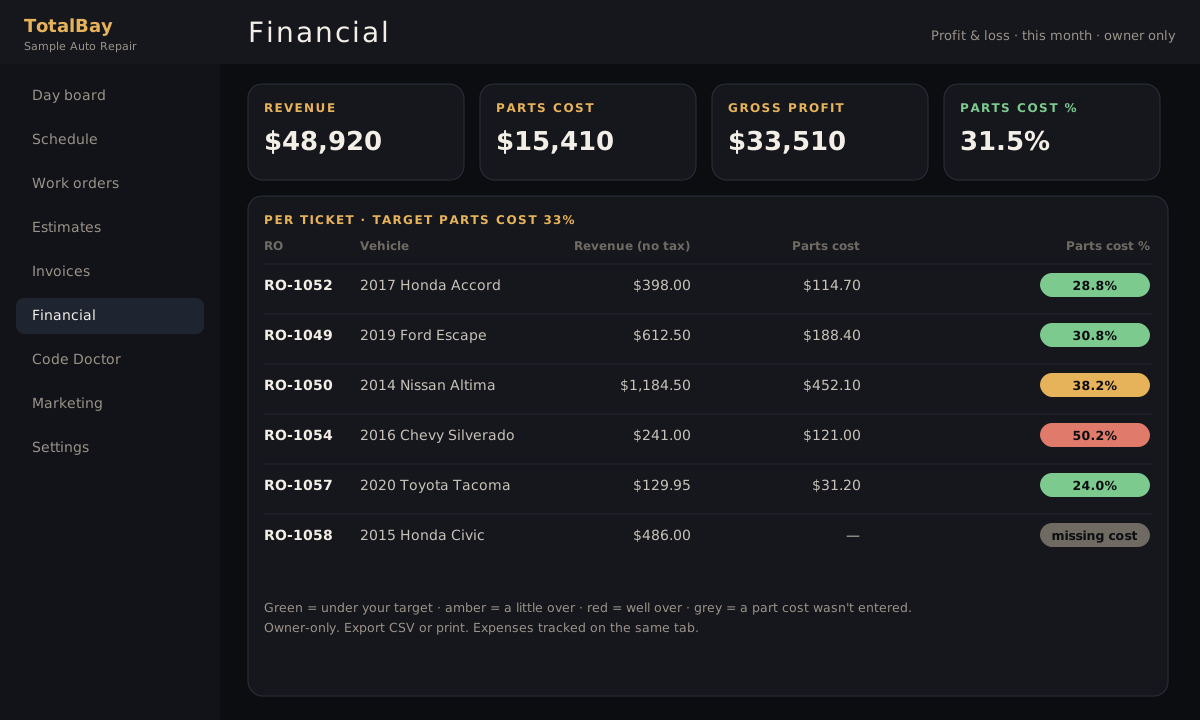
Financial tab: profit and loss
Owner-only P&L. Every ticket shows its parts cost as a percent of the sale, colored against your target, so you can spot jobs that were priced too low.
-

Step 9
Code Doctor
Enter the fault codes and get a step-by-step test path on the work order, so the tech tests before replacing parts.
-
Step 10
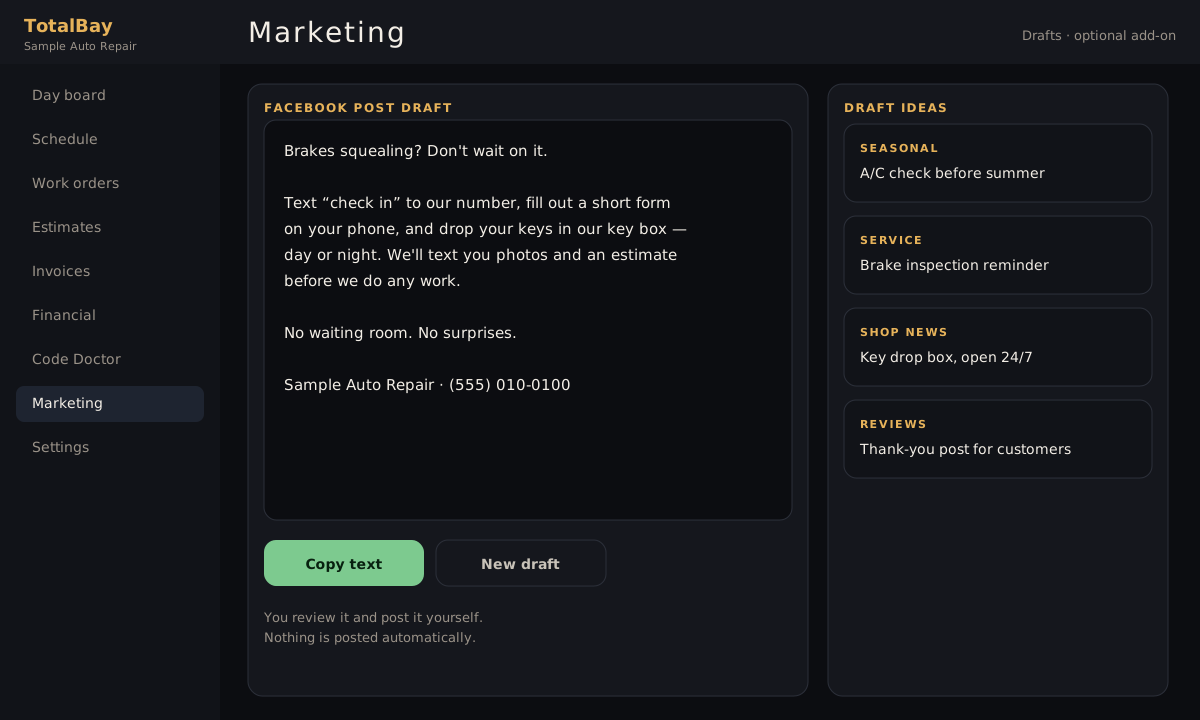
Marketing drafts
Optional add-on. Writes Facebook post and ad drafts from a few preset ideas. Copy and paste the ones you like, delete the rest. Nothing posts automatically.
Running the business side
The numbers behind the bays. Profit and loss is limited to the owner/admin login.
Profit and loss, for shops that run by COGS
Every estimate shows parts cost % to the whole team, with a warning before it’s sent if something looks off — a cost missing, a part priced below cost, or parts cost over your target. Owners can hide costs with a manager password. Costs never show on anything the customer sees. Profit and loss on invoiced and paid work, with cost of goods for the period and parts cost % on every ticket. Each ticket is green when it’s under your target (33% by default — you set it), amber when it’s a little over, red when it’s well over, and grey when a part cost wasn’t entered. Operating expenses like rent and payroll go on the same report. Print it or export CSV.
Where every part came from
Each part on an estimate keeps its vendor and cost, including parts bought outside your main supplier. Stock orders go on the Purchase orders tab with the supplier, line items, and unit cost, and receiving an order adds it to your shelf inventory. Your vendors are kept in one list.
Tech hours
The Sales tab shows labor hours from paid jobs for any date range — total and by tech, with labor dollars and job count for each.
Bay balance
The bay board shows each bay and each tech’s planned hours for the day against capacity, and flags anyone overloaded. Tap Suggest balance and TotalBay proposes putting unassigned jobs on the least-loaded bay and tech. The desk reviews the moves and applies them.
Declined work doesn’t get lost
When a customer passes on a job, the desk marks it “Declined for now” and the customer acknowledges a short safety note. It stays on file for that vehicle and shows up the next time the car is in. After a set time (45 days by default, you choose), the customer gets a friendly email reminder about it.
Review requests after the visit
A couple of days after the job is paid (you set the delay), the customer gets an email asking how the visit went. “Went well” takes them to your Google review page. “Could have been better” sends their note privately to you, so you can make it right.
Shelf inventory with a reorder check
Track the parts you stock with on-hand and minimum quantities. The reorder check lists what’s at or below minimum and what’s moving fast on recent jobs. With your shop’s OpenAI key, AI weighs recent job usage too; without it, the check uses your minimums. It suggests — you decide what to order.
Parts workflow
How parts move from lookup to order on a TotalBay repair order today, and where automatic ordering will fit. Parts lookup works through the shop’s own NexPart account. TotalBay is not affiliated with or endorsed by any parts supplier.
- Vehicle on the work order. Year, make, model, engine, and VIN (when available) are on the repair order from check-in or the desk.
- Parts lookup. The desk searches parts for that vehicle from the work order, using the shop’s own supplier account.
- Desk picks the parts. The desk checks the parts it wants. Nothing is added until someone picks it.
- Picked parts go on the estimate. Each picked part becomes an estimate line with the shop’s markup, next to the labor.
- Customer approves and signs. The customer reviews the estimate on their phone and signs to approve.
- Pending supplier approvalAutomatic ordering plugs in here. On approval, the picked parts are sent to the supplier cart, the order is placed, and the supplier’s order number is returned to the repair order. This step is not live yet.
- “Parts need ordering” reminder. Until then, the approved repair order shows a red Parts need ordering reminder on the work order and the day board.
- Desk places the order. The desk orders through the supplier as usual, then taps Mark ordered and enters the order number. The reminder clears.
- Customer is told. The customer gets a “parts are on order” text and email.
Good to know
- Texts and emails go out from your shop’s own number and email. You connect your own texting provider and email account in Settings.
- AI photo notes use your shop’s own OpenAI key. Without a key, photos still attach with the tech’s notes.
- Parts: today you look up parts and add them to the estimate, and your shop places the order with your supplier. The desk shows a red reminder until it’s marked ordered. Automatic ordering is pending supplier approval (see Parts workflow).
- Specs (torque, fluid types, capacities) are looked up automatically and printed on the tech copy. Unconfirmed specs are flagged. TotalBay is not a repair manual — you keep using the repair-information service you already have.
- Customer payments go through your own Stripe account. Paying at the counter still works.
Coming soon
These are not live yet. We list them so you know what’s coming, not as part of what you get today.
Automatic parts ordering Pending
Pending supplier approval. Once approved, picked parts on an approved estimate will go to the supplier cart, the order will be placed, and the order number will come back to the repair order. Until then, your shop places the order and TotalBay reminds the desk until it’s done. See the parts workflow.
Add-ons coming soon
- Phone answering Coming soon — an optional add-on that will answer your shop phone after closing and on weekends, so a call ten minutes after you lock up gets answered instead of going to voicemail. Your shop never completely closes. Not available yet.
- In-bay scope diagnostics Coming soon — scope diagnostics in the bay, with readings saved to the work order.
- Test drive recording Coming soon — a phone rides along on the test drive and logs noise and motion to help track down squeaks, rattles, and vibrations.
What would you add?
Tell us what your shop needs that you didn’t see here. Mike reads every one. We won’t add you to any list.
Everything you just saw, in one system
- Appointments on a calendar with a column per tech
- Text “check in” and phone drop-off form
- Key drop box flow, day or night
- Status updates by text and email from your own number
- Inspection photos, with AI notes on your own OpenAI key
- How-it-works videos on the estimate
- Estimates with parts lookup and labor
- Digital signature on the customer’s phone
- Online payment through your own Stripe
- Pickup notice and after-hours lockbox pickup
- Day board and bay board
- Work orders with photos, notes, and a full timeline
- Tech paper copy with specs looked up automatically
- Recalls from NHTSA; TSBs and maintenance from your connected service
- Invoices
- Parts cost % on every estimate for the whole team (owners can hide it); owner-only profit and loss with COGS
- Vendor and cost on every part; supplier purchase orders
- Tech hours by tech
- Bay balance across bays and techs
- Shelf inventory with a reorder check
- Duplicate-parts check before an estimate is sent
- Declined work kept on file, with a follow-up email
- Review request email after the visit
- Code Doctor for fault codes
- Marketing drafts (optional add-on)
That’s the whole visit and the whole desk. TotalBay base is $249/mo, with Marketing as an optional add-on. If most of this list would help your shop, it’s worth a look.